

Just in time to celebrate- a cute shirt to wear to the fireworks show!
Simple, simple, simple.
And relatively cheap. If you don't have a spare white T-Shirt pick one up at the deep discount stores, dollar store, outlet/seconds place. In this neck of the woods we have Big Lots and Gabriel Brothers.
You need:

White cotton T-shirt
Sharpie permanent markers in a variety of colors
Quarter or bottle cap (optional)
Rubbing Alcohol
Small dish or cup- shot glass works too
Eye dropper
Cardboard or a thick layer of newspaper
Iron
If you've looked ahead, you might be put off that there are 7 steps involved. No worries- it doesn't actually play out like that in real life.
A note about the photography in this post. These pics were taken with three different cameras, on two different days, in two different places- one with a group of patients and one in my crafty romper room at home. That's why things look "dual personality".
OK- let's light 'em up!
Step One- A Good Foundation

Cut a piece of cardboard so that you can slide it up inside the shirt. You want it wide enough to hold the shirt out flat (maybe even stretch it a bit but not essential) and long enough so that you can make your design over as much of the shirt as you would like. You can use newspaper instead to the same size specifications.

You want your shirt nice and flat.
Consider folding the sides back under the cardboard so that your design stays on the front and won't seep through to the back if you accidentally mark on part of the shirt that does not have the cardboard under it.

If you are having trouble keeping the shirt smooth and flat you can pin it in place around the edges with a few push pins or thumb tacks.
Step Two- Don't Drink This

Pour a bit of rubbing alcohol into the little dish or cup (or shot glass) and keep it handy with your eye dropper.
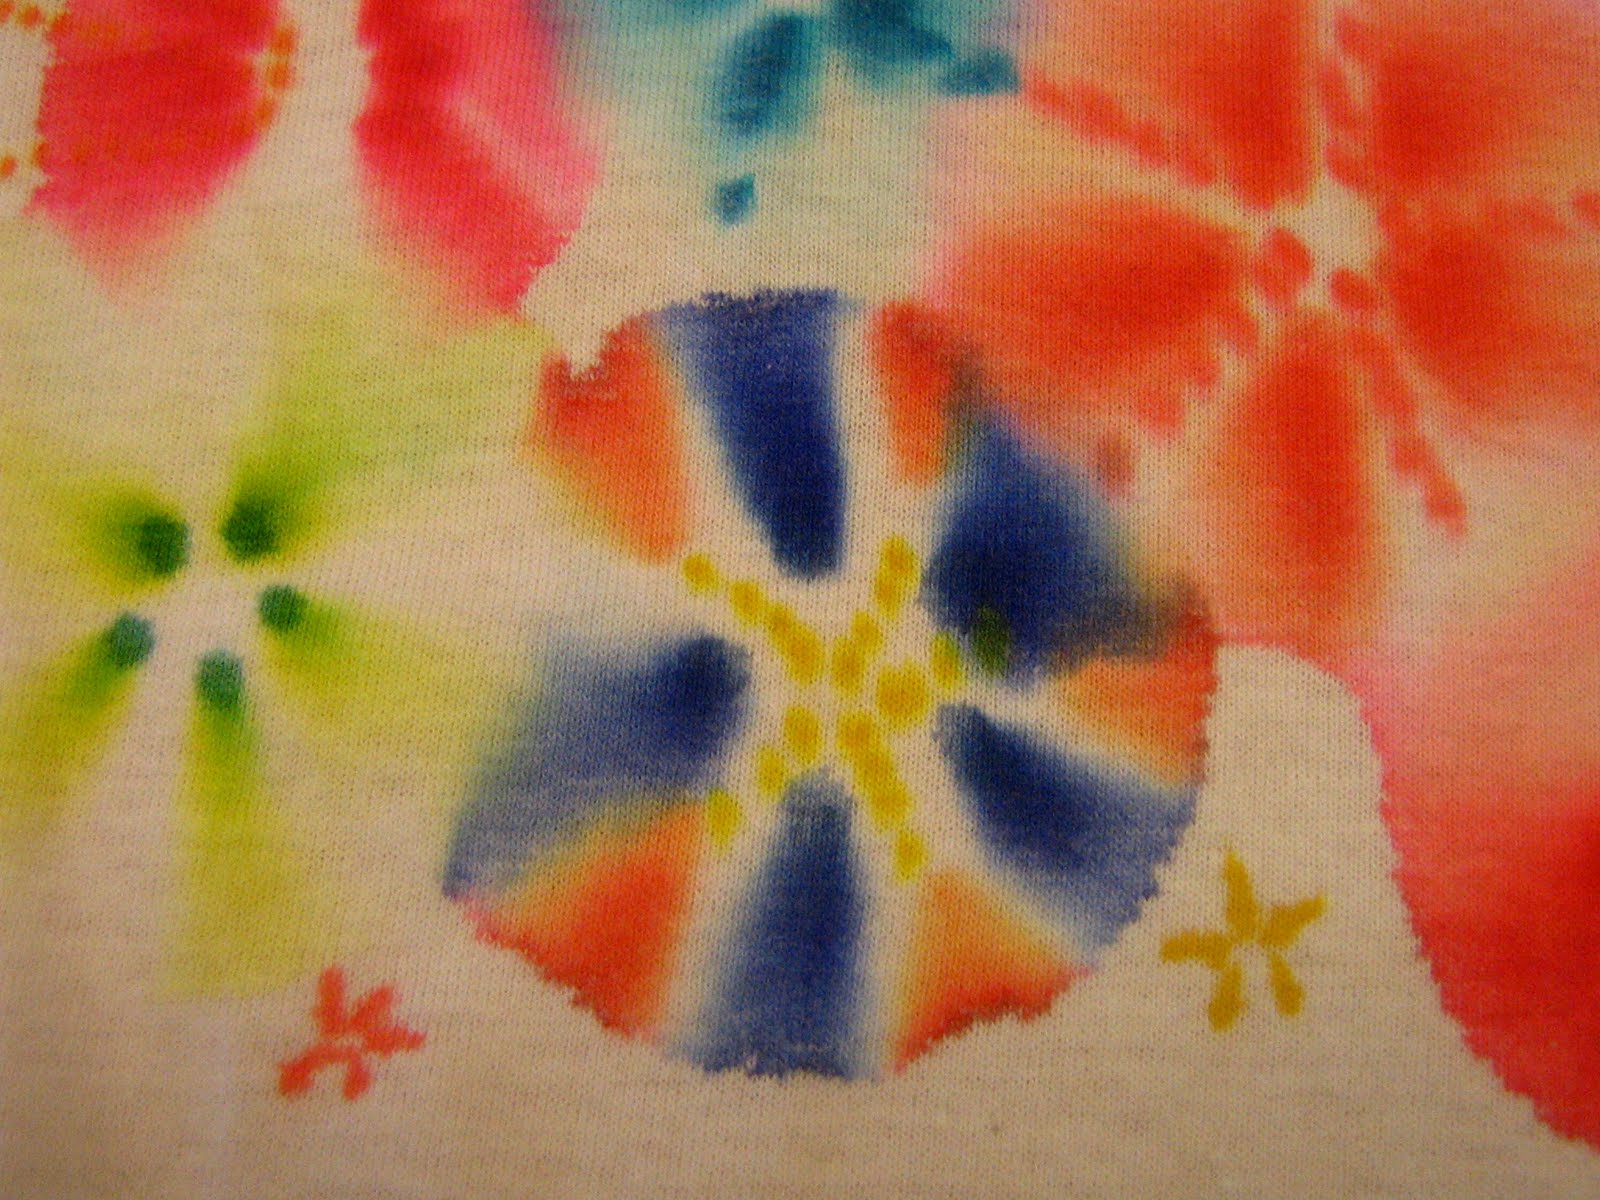
Step Three- Loading Up The Fireworks

Using a Sharpie marker, make a circle of dots spaced evenly around the quarter or bottle cap. You don't have to use the coin or bottle cap but it gives you an idea of about how big to make your circle.
The circles can be slightly larger, but only slightly, as well as a good bit smaller. You'll figure it out in a flash after the next step.
Don't be skimpy with the ink but rather get your dots nice and juiced up with Sharpie ink. Instead of trying to draw little circles, you can dot out your initial circle and then go back over each dot with the marker by tapping it in the same place to increase the size and amount of ink. Or hold your marker in one spot for a couple of seconds.
Step Four- Making the Magic Happen

Using the eye dropper, drip several drops of rubbing alcohol into the center of your circle of dots. Just like when you splop food on your favorite blouse, the rubbing alcohol will expand and spread through the fiber of the T-Shirt. As it absorbs into the fabric and passes over your dots it will pick up the ink and carry it outward. Just like with your favorite, most expensive blouse. The final size of the fireworks burst is determined by a couple of things: how much ink (and to a lesser degree the color) you loaded your dots with, and how much rubbing alcohol you drip into the center. That means that the more alcohol you add, the further it will travel but keep in mind that there is ultimately a finite limit to its expansion.

Step Five- What Kind of Fireworks Do You Have?
Here are some of the different ways you can make your fireworks.
A simple circle of dots, many or a few, as demonstrated above.

Evenly spaced dots of one color with dots of another color in between.


"Side-shooters". Add dots to only a portion of each side of the circle so that they look like the fireworks that shoot out the sides.


Another variation of the side-shooter.
This side-shooter (orange burst) had accent dots added afterwards.


Spiral fireworks.


Text.
Yes, spell it out with a row of dots and then drip rubbing alcohol on each dot. Go easy on how much alcohol you add or the ink will blur out your word as it spreads. You can go back over the original dots to emphasis the words.
Step Six- Adding The Shazaam
 You can use a Sharpie to fill in sparkle and Shazaam bursts for accents.
 You can add dotted lines or other accent elements to the fireworks also.
Don't add rubbing alcohol to these accent marks.
You can also use glitter glue to add some sparkle (which I usually like to try to fit in somewhere) but I can't tell you how many washing it will last through.
I tried using a silver metallic Sharpie once but it did not carry in the alcohol. You could, however, use the metallic markers to add your Shazaam bursts once you had all of the fireworks going off all over your shirt.

Step Seven- Get It Set

Let your shirt dry with the cardboard inside. The ink will need to be set before you wash or wear it so place some paper towel over the design and iron it with a fairly hot iron for 3 or 4 minutes. Another common practice for setting inks and dyes is to put your fabric in a hot dryer for 20 minutes or so. Because I usually do this craft with patients I like to do both- iron the shirt and dry it in the dryer. Overkill, yes, but I have this near obsessive fear of a patient going home with a really cool project that they love only to have it fall apart, fail, or fade away. So I iron and dry.
OK- let's see what we've got.

These shirts were made by patients where I work, all elderly, an even split of men and women, some craft vets and some craft babies.

My favorite shirt in the bunch was made by a woman who described herself as a "Craft Atheist." I told her I could make a believer out of her and she conceded afterwards that she just might convert.
Yeah!
Love it when that happens!


 And some of my fireworks.

So what are ya' waiting for !!!
Fireworks at dusk !!!
Happy Fourth y'all ~
Addendum:Fast Forward There's been terrific response to this project and I'm thrilled y'all are having fun doing this with your kids. Check out this post from 2011 that shows a variation on this craft. It's just as fun. Thanks so much-- Chrysalis.

That is a really cool idea!!
ReplyDeletethat is awesome! My kids and I are definitely making these!!!
ReplyDeleteTotally unique - would never have thought of using the alcohol with the sharpie in this way! Love it!
ReplyDeleteI love these!!! I think we have our craft for today!
ReplyDeleteFirst of all, this is awesome! I can't wait to try it with my daughter. Secondly, "craft atheist" is the funniest thing I have heard in a long time! How fun that you converted her. ;)
ReplyDeletethanks again for sharing this! found you via the crafty crow today!
vanessa
This is fantastic! I have been looking for a way to color shirts that didn't involve tie-dye. So glad that I found you through Crafty Crow. Thank you for sharing your ideas.
ReplyDeleteThose are awesome! And SO SO easy! Can't wait to give it a try!
ReplyDeleteAwesome! I am definitely trying this one! Thanks for sharing.
ReplyDeleteI love this activity! I use it with my 4-Hers and my Extension Homemakers Clubs! It is fun, easy set up and let's everyone be creative. The last group I did this with was at church camp! It was fun decorating a special shirt for camp!
ReplyDeleteWhat a fun -- and creative -- idea! I must try this one day soon! The fireworks remind me of morning glory flowers. Very pretty.
ReplyDeleteWay too cool!!! We'll be making this for the parade on Monday! THanks for a terrific idea!
ReplyDeleteLove this! My kids already have shirts for the 4th but I'm so tempted to make them these as well.
ReplyDeleteI did this with the kids today. The one little guy did not want to be babysat and did not want to do a craft but he was awestruck by the magic and kept making dots and saying "I have another one!" for me to drip alcohol on. The he counted them on his shirt 24 . . . 25 . . . 29 . . . He was a happy camper after this! We can't wait for the 4th to show them off.
ReplyDeletethis is such a cool project!! cant wait to try it with my kids!! thanks for sharing!!! please stop by and link up at our link party!!
ReplyDeleteAmy
www.SistersoftheWildWest.blogspot.com
I featured you!
ReplyDeletehttp://allawesomelinks.blogspot.com/2011/07/making-your-own-fireworks-on-t-shirts.html
Awesome! I made tie dyed socks the other weeks with Sharpies and I could have used this info sooner! Oh well, I'll have to try again.
ReplyDeleteOhhh- tie dye socks! Now I know what to do this afternoon! Thanks for sharing.
ReplyDeleteSo much fun! My 6 and 8 yr olds LOVED it and did a great job, too!!
ReplyDeleteIs there any way I can post a pic in a reply here?
Dear Anonymous- I don't have any linky things set up on this blog (yet?!) but if you email a photo to me, I would love to post it. My address is on the side bar. Thanks so much and glad the kids had fun. Did they go "Wawww, cool?" when the ink started to spread? Love that reaction!
ReplyDeleteThis is so much fun! Thank you for sharing.
ReplyDeleteThank you so much for this idea! My children made these shirts yesterday, and it was really fun! :D If you'd like to see, I posted pictures in my blog today. :)
ReplyDeleteI tried this it came out great. I ironed and dried it in the dryer but when I washed it (by itself thankfully) I did have a bit of bleed (faint pink and yellow) onto other parts of the shirt. I wonder if a vinegar spray when ironing would help set this better?
ReplyDeleteGreat collection t-shirt....
ReplyDeletei would like to make one of dem 4 me.....
Thanks a lot 4 shearing it.....
keep it up!!!!! :)
Military T Shirts
This is SO pretty, and it looks like fun too!
ReplyDeleteI have just one question, I live in Holland and we don't have sharpie markers over here. What kind of marker can I use instead? Can I use a textile marker?
Thanks for sharing!
Greetings Claudia
waw!! this is a good way to colorful your t-shirt.I am really pleased to see these page and design of this page.Its really made me think.
ReplyDeletesell my house
Hi! Is it ok if the tshirt is 50/50 cotton/polyester blend?
ReplyDeleteI teach and I just made a couple of samples. They are so great! I can't wait to have my class make them. Thanks so much for sharing your creativity!
ReplyDeleteI'm sure your class will love them- the colors are so fun.
ReplyDeleteFantastic!! I'll make them with my students! Thank you for sharing!!
ReplyDeletesuperb..! the t-shirts looks so awesome when this type of design print on it..
ReplyDeleteMy cousin recommended this blog and she was totally right keep up the fantastic work!
ReplyDeleteSharpie Paint Markers
I think this idea is absolutely precious! Thank you so much for idea to share with my grand children this summer.
ReplyDeleteJust used your marvelous tutorial for a 4th of July party and linked back to you in the blog post! (http://tikkido.com/node/842) Thanks for the great instructions. The kids *loved* the project.
ReplyDeleteWhat can you do when you wash the t shirts, to make sure they dont run? I dont want to loose the color in my t shirts! They are just too cool looking!
ReplyDelete