Wednesday, June 30, 2010

Ribbon Picture Frame II- Backing

In my previous post, I showed you how to make this Ribbon Picture frame.

Today let's take at look at how I finished the back of the frame. Of course this step is totally optional but I'm a bit obsessive about things you can't see so I like to cover the back.


You need --- felt and glue- pretty basic stuff.

Outline your frame, inner and outer edges, onto the felt. It's best to do this before you start painting the frame or by using another unfinished frame.


Cut the felt backing out a bit smaller than your outline marks (dotted lines illustrate). This keeps the backing from being too big and overlapping the edges, thus showing on the front.


Mark the peg hole and snip a little "X" out on the felt. I just placed the cut out felt backing over the frame and used an Exacto knife to make the hole.


Add glue or Mod Podge and spread it out with a brush and then...


... adhere your felt to the back of the frame. You can adjust and smooth the felt while it is still wet.


Don't forget to sign your work!

Monday, June 21, 2010

Ribbon Picture Frame

This seems like such a classic craft project: scissors, glue, and ribbon. Even glitter, because the craft isn't done until the glitter has been added.

I'm not kidding myself to think that I am the first person to invent this project but this is my version.


I was really stuck for a craft idea at work one day last week so I sat myself down and asked,

 "What do I have?"


Wooden frame (this one's from Michael's)
Gesso
Paint (acrylic craft paint)
Glue Stick
Ribbon
Mod Podge
Glitter

A-Ha!

Decoupaged Ribbon Frames, of course!!

So get all your stuff together and let's get started.


First, gesso your frame.This will prime it and cover the wood grain. If you like the grain or it fits into your design, by all means skip this step.


Once the gesso dries, paint your frame. You may want to add a second coat to get good color saturation but be sure to let your frame dry very well before you go to the next step.
 Now comes the fun part! Cut out strips of ribbon long enough to fold over the edges of your frame, around to the back. You can use as many kinds of ribbon as you want: every strip different, three kinds, all one kind. Just play around a bit- that's what it's all about, right?

I like to cut all my pieces out and get my layout figured out ahead of time but of course you can fly be the eat of your pants and make it up as you go along.

I used a couple of different textures for this project. The plaid and the polka dots ribbons are a paper ribbon with a slick coating. This type works but can be a bit tricky- sometimes the coating starts to come off once the glue hits it and sometimes you have to "encourage" the ribbon to stick.


Apply a strip of glue to your frame (get it nice and glue-y) and ...

... start laying down your lengths of ribbon, smoothing them out with your fingers. Let the ends over
lap the sides.

Now things start to get a bit interesting. Apply a nice coat of glue to the edges and the back of your fame. Then wrap the ribbon around to the back and you'll most likely need to hold the ribbon in place for a few beats to get the sticking to happen.


For paper ribbon-


you may want to crease it where it wraps around the frame.

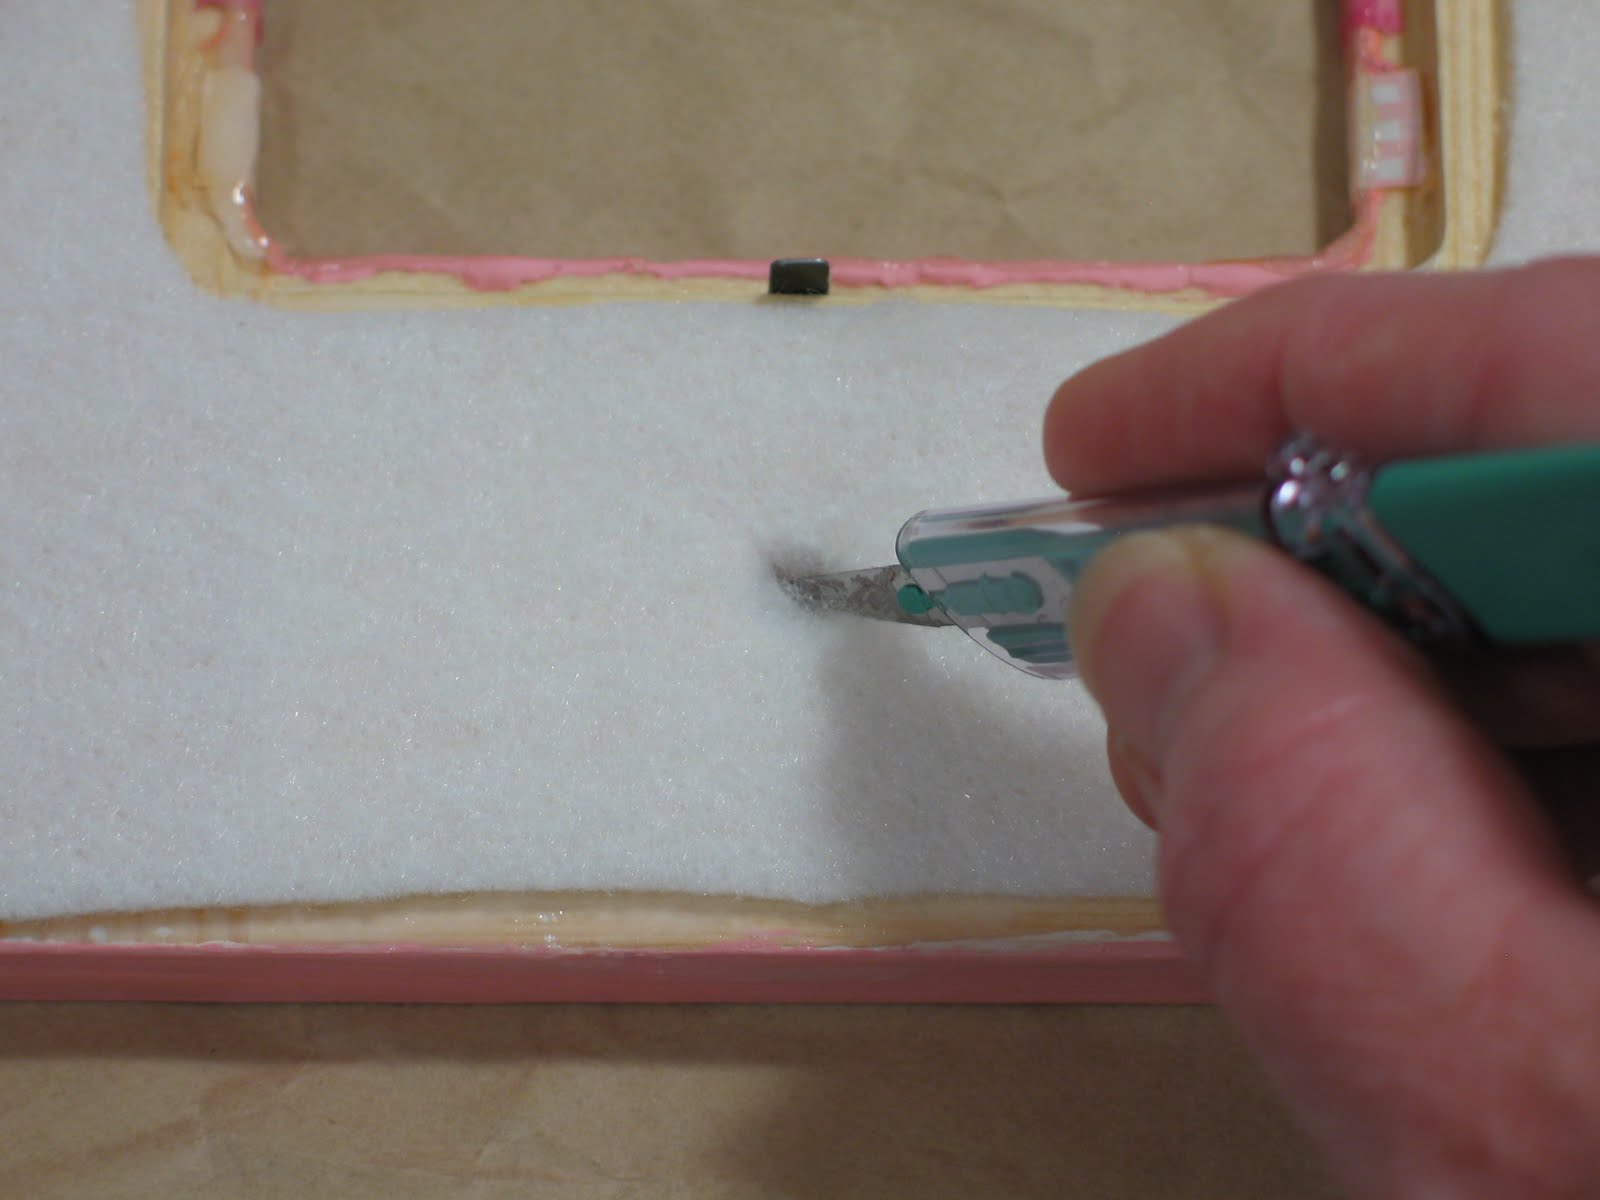
I wanted the ribbon on the inside opening of the frame to wrap around the edge.

So I made a mark on each ribbon to indicate where I wanted it to end and cut the ribbon there.

Then I put a good bit of glue on each ribbon and the frame, one at a time, wrapped it around to the inside, and held it in place with the end of a bone folder until it stuck.


Hint Hint Alert !

Don't pull too hard on your ribbon as you wrap it around the frame. The increased tension on the ribbon causes it to pull away from the frame and I had a devil of a time getting the ribbon to stick, especially the paper ones, until I figured this out.

You can also just cut the ribbon off at the edge, which is fine too, but I would encourage you to make sure you have the ends glued down very well so they don't peel up later.

Once all of the ribbon lengths are glued on, let your frame dry. I went back and rubbed off the glue that was exposed on the wood between the ribbon as I discovered that it sometimes balls up and besmirches your project when you start adding the Mod Podge.

And coating it with a good layer of Mod Podge is the next step. I used two coats, letting it dry well between each coat, and .......


La-a-a-a-a...
sprinkled glitter on the last coat while it was still wet.

And thar she be ..... cute as a button.
Keep in mind that the ribbon doesn't have to go horizontally on the frame. But if you want your ribbon to go in a specific direction or for your frame to have a definite top and bottom be sure to check the hole on the back for the peg to make sure you work on the frame in the orientation that you want.
Yes, I've made a frame that ended up with the peg hole on the side!

Here are some other frames I made, just for fun.

On this yellow one I simply cut the ribbon at the edges instead of wrapping it around to the back. Umm, don't like it really but there it is.


In my next post I'll show you how I finished the back because it just occurred to me that I left that part out.

Oops! and Sorry!

So we'll do that next time.

Wednesday, June 16, 2010

Laundry Day

It's a favorite spot for a nap. While it's true that everyone has a favorite cool spot to retreat to on these hot and humid days, I sure wish he would do a load while he's in there.

Monday, June 14, 2010

Cold Strawberry Soup with Angel Food Croutons

When some folks, generally the culinarily unadventurous, hear Strawberry Soup mentioned for the first time, they almost always wrinkle their nose and look at you as though you just sprouted tulips out your ears.

I know a couple of people who don't like strawberries (incredibly) but they do like Strawberry Soup. There are many versions of cold strawberry soup floating around out there: some with wine, some with yogurt, some with orange juice, some with mint, some that you heat first, some that you freeze. It's endless though I would like to try them all. I like this version because it is easy, fast, and really tasty.

 You need:

2 pints of fresh strawberries
1 cup of half and half
1 cup of sour cream
2 tbsp of lemon juice
1/3 cup of sugar
nutmeg


But first ... you have to make the Angel Food cake croutons.

Do this first.
Trust me, once you get the soup whipped up you won't want to wait for the croutons and they do add a nice twist to the strawberry soup eating experience.


All you need for the croutons is angel food cake. I hate to admit that I bought a loaf of angel food in the store for this project because homemade, even from a mix, is so much better. But today it's store-bought.

Cut your cake into cubes, about an inch or so but it doesn't actually matter. Big cubes are OK too.
Next, spread them evenly on a cookie sheet and toast them under the broiler.

Just a hint- line your cookie sheet up with the direction of the broiler. Otherwise the croutons directly under the broiler flame with toast and the ones that aren't will only get warm.


Keep an eye on them though because they toast up quickly and it's so easy to burn them.
When they look a bit golden, take them out of the oven, turn them over, and stick them back into the oven.
Then I turn off the oven and leave them in there to finish toasting and to dry out somewhat so they are a little crunchy. Just keep an eye on them until the oven starts to cool as they do burn quickly.
Please don't ask me how I know this with such certainty. Thanks.


OK now the soup----


Wash and hull the strawberries


and drop them into your blender. Puree.

You can add the half and half as well as the lemon juice to the blender if it helps to puree.

Pour the pureed strawberries into a large bowl and add the sugar, sour cream, and nutmeg.
Stirring in the sour cream by hand, as opposed to putting it in the blender, helps the soup stay thicker.


Serve with the Angel Food cake croutons and even strawberry garnish if you like.


I'll be honest---

you may as well get a bigger bowl than this.

Enjoy!

Sunday, June 13, 2010

Mega- Mallows

There I was, minding my own business at the grocery store and WHAM!!! Giant Roasters Marshmallows!
I cannot believe the size of these marshmallows! We like to keep a stash of marshmallows on hand at our house because we'll light up a campfire just about any ol' time. We're also pretty big S'Mores fans, even though I usually max out after one. But I definitely meant to buy marshmallows. I just had no idea what was waiting.


These puppies are way bigger than regular marshmallows.

Sorry that I didn't actually open the package but we don't have air conditioning in our big ol' farmhouse and as we're in the middle of a stretch of particularly humid weather, well .... you know how marshmallows will get after awhile in an open bag. Not that an open bag stays full of marshmallows for very long at our house.


When we make S'Mores, we snap the rectangle of graham crackers in half so that a square of graham will nicely hold some chocolate and a marshmallow.

Not so for these guys. Not only does the package recommend an entire rectangle of graham crackers, it also takes only
one marshmallow
and an entire chocolate bar.

I love S'Mores in almost every variety but
that's just crazy.

The funny part is the marshmallow camper guy on the package. He looks a little embarrased by his size and a bit frightened in the face of all that sugar.


Just like I'm going to look the next time we fire up a campfire and drag out these fellas.


I will go for the jumbo S'Mores but I'll only have one.


Friday, June 11, 2010

My Dala Horse IKEA Hack

A few years ago, IKEA sold their modernized version of the Dala Horse, a decorative wooden horse from Sweden. Originally carved as toys, Dala horses became items used for barter for household goods as their popularity grew. The earliest record of a Dala horse for sale is from 1623. Traditionally carved and painted by a handful of artisans, mass production of the Dala horse began in the 1930's after they were featured in the World Fair. The horses are carved and decorated in specific patterns according to the locality of their makers, meaning which village or valley. The most easily recognized Dala horses are the bright orange-red ones from Nusnas painted with a kurbit saddle . A kurbit is a vine and the tradition of painting the horses this way comes from the Biblical account of Jonah's struggles to understand why God would so freely forgive the sinful Ninevites. God caused a kurbit, or a vine to grow up and shade Jonah as he pouted on the hillside overlooking Nineveh. The wiggly painting on the saddle represents the kurbit.

I have a small collection of Dala horses (about 10), most of which I don't remember where I acquired. A couple came from my mom, one I bought over the phone from a gift shop in Westby, Wisconsin while on maternity leave, another came from my aunt.

The tiny little guy shown here is barely half an inch tall but Dalas come in a variety of sizes and colors.

I also have two Fjord horses from Norway. They are decorated with the traditional decorative painting of Norway called rosemaling. I personally prefer the Fjord horses, or Fjording horse, as that is my heritage and the rosemaling makes me think of my mom. She is a talented and creative lady and rosemaling has been around our home for as long as I can remember.


Fjord horses are beautiful draft horses which originated in western Norway. They have a very distinctive build and while a small horse, they are strong enough for heavy farming but agile enough to be driven. Fjord horses also compete in dressage. They are beautiful, gentle tempered horses.

Photo from Tomasz Sienicki at Wikimedia Commons


So back in the 1990's IKEA marketed their version of the traditional Dala horse sporting a variety of paint jobs. I'm sorry that I don't have photos. One horse had a rose tattooed on its hindquarter, a tribal vine tattoo around a front leg, and a piercing in its ear. I had the academic horse- gray with a pair of Buddy Holly glasses, covered with a smattering of typeset characters. It was cute for awhile but eventually it ended up in the "been there, done that, moved on" cupboard for abandoned decorating accessories. Soon an idea began to germinate: if IKEA can decorate a Dala however they please, why can't I? Then came scrapbooking. Now, I'm not really a scrapbooker- I don't have that gene. But I love the paper. Last Halloween I decoupaged pumpkins with my patients using scrapbook paper and that's when I knew what to do with the literate looking horse in the closet.


I tore up almost two sheets of scrapbook paper and covered him bit by bit (aha- get it? "Bit", horse's bit, like in their mouth. Oh stop it) using what I once heard referred to as "craft nectar"- Mod Podge. It was glorious messy fun. To be consistent with the sizes of torn paper I had to make them smaller than I might otherwise have done because of the logistics of getting the paper, which was kind of thick, to go around his horsey parts.


I would maybe use a different pattern if I were to do it again but he's fine the way his is and keeps watch over us on the rare occasion that we watch TV.


Want to try this?
Please, don't cover a real Dala horse.

I mean I suppose it's your choice but Dalas are not cheap. According to a quick Internet  search, a twelve inch horse can range between $130 to $275 depending on where you shop. You can maybe do better with an online auction such as ebay.com as there are Dalas all over there but you have to be careful. It would be so sad to decoupage over a vintage horse. If you stumble across a Dala at a yard sale and it's going for a quarter- buy it. But don't cover it as it very likely is vintage and $$$$$ more than a quarter. It is possible to find unpainted Dalas on the Internet for a bit cheaper and in the past I've seen papier mache horses (not necessarily Dalas). So I guess I was lucky to have a mass produced non-Dala Dala horse to play with. But maybe you'll be inspired to look at the things around you in a new light.

"If Chrysalis can cover a horse ...."