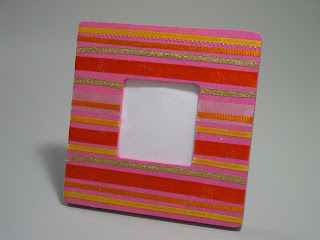
This seems like such a classic craft project: scissors, glue, and ribbon. Even glitter, because the craft isn't done until the glitter has been added.
I'm not kidding myself to think that I am the first person to invent this project but this is my version.
I was really stuck for a craft idea at work one day last week so I sat myself down and asked,
Wooden frame (this one's from Michael's)
Gesso
Paint (acrylic craft paint)
Glue Stick
Ribbon
Mod Podge
Glitter
A-Ha!
Decoupaged Ribbon Frames, of course!!
So get all your stuff together and let's get started.
First, gesso your frame.This will prime it and cover the wood grain. If you like the grain or it fits into your design, by all means skip this step.

Once the gesso dries, paint your frame. You may want to add a second coat to get good color saturation but be sure to let your frame dry very well before you go to the next step.
Now comes the fun part! Cut out strips of ribbon long enough to fold over the edges of your frame, around to the back. You can use as many kinds of ribbon as you want: every strip different, three kinds, all one kind. Just play around a bit- that's what it's all about, right?
I like to cut all my pieces out and get my layout figured out ahead of time but of course you can fly be the eat of your pants and make it up as you go along.
I used a couple of different textures for this project. The plaid and the polka dots ribbons are a paper ribbon with a slick coating. This type works but can be a bit tricky- sometimes the coating starts to come off once the glue hits it and sometimes you have to "encourage" the ribbon to stick.
Apply a strip of glue to your frame (get it nice and glue-y) and ...
... start laying down your lengths of ribbon, smoothing them out with your fingers. Let the ends over
lap the sides.
Now things start to get a bit interesting. Apply a nice coat of glue to the edges and the back of your fame. Then wrap the ribbon around to the back and you'll most likely need to hold the ribbon in place for a few beats to get the sticking to happen.
For paper ribbon-
you may want to crease it where it wraps around the frame.
I wanted the ribbon on the inside opening of the frame to wrap around the edge.
So I made a mark on each ribbon to indicate where I wanted it to end and cut the ribbon there.
Then I put a good bit of glue on each ribbon and the frame, one at a time, wrapped it around to the inside, and held it in place with the end of a bone folder until it stuck.
Hint Hint Alert !
Don't pull too hard on your ribbon as you wrap it around the frame. The increased tension on the ribbon causes it to pull away from the frame and I had a devil of a time getting the ribbon to stick, especially the paper ones, until I figured this out.
You can also just cut the ribbon off at the edge, which is fine too, but I would encourage you to make sure you have the ends glued down very well so they don't peel up later.
Once all of the ribbon lengths are glued on, let your frame dry. I went back and rubbed off the glue that was exposed on the wood between the ribbon as I discovered that it sometimes balls up and besmirches your project when you start adding the Mod Podge.
And coating it with a good layer of Mod Podge is the next step. I used two coats, letting it dry well between each coat, and .......
La-a-a-a-a...
sprinkled glitter on the last coat while it was still wet.
And thar she be ..... cute as a button.
Keep in mind that the ribbon doesn't have to go horizontally on the frame. But if you want your ribbon to go in a specific direction or for your frame to have a definite top and bottom be sure to check the hole on the back for the peg to make sure you work on the frame in the orientation that you want.
Yes, I've made a frame that ended up with the peg hole on the side!

Here are some other frames I made, just for fun.
On this yellow one I simply cut the ribbon at the edges instead of wrapping it around to the back. Umm, don't like it really but there it is.
In my next post I'll show you how I finished the back because it just occurred to me that I left that part out.
Oops! and Sorry!
So we'll do that next time.


