Pages

Wednesday, October 27, 2010

The Scary Cat at Our House


Smudge.

She's the Alpha Dog at our house.
Aloof but loving under her own terms.
She can rub against our legs.
When she feels like it.

Sometimes we can pet her-
on the head, behind the ears, but not the back.
Sometimes she lets me pet her all the way down her tail,
giving it a little twirl,
but she better be in front of a full bowl of food when I do.

Always maintain eye contact with her,
so you can see that split second burst of light
right before she turns around and slashes you.

Sexy psycho serial killer.
No mouse too small,
no dog too big, no bird too fast.
Huntress.
Queen of the Coyotes.

Thirteen years of living outside
has made her slick and wily.
Her fur is thick and rich.
We're all little afraid of her and
approach her with deference and respect.
And caution.

Smudgie the Cat.
Our Alpha Dog.


Monday, October 25, 2010

Chicken Dip


I've always loved, and given a work out to, my big red crock pot. The past several weeks we've been without a source of gas for the stove (more on that in a few days) so the ol' crock pot has been doing extra duty. I was in a bit of a quandary when a recent family get together required my bringing a couple of dishes and someone had already signed up for veggie and fruit trays. Then I remembered this great dip recipe from a co-worker.

There are four basic ingredients plus an optional fifth:


2 large cans of chicken breast
1 cup of Ranch
8 oz cream cheese
2 cups of cheddar
Tabasco or other hot sauce to taste, optional
       (You could omit the Tabasco and use Jalapeno Ranch instead)


Rinse and drain the chicken breast. Using two forks, shred the chicken.

Put all of the ingredients into your crock pot and cook on high for 20 minutes. Stir frequently to get everything all nice and melty and mixed.


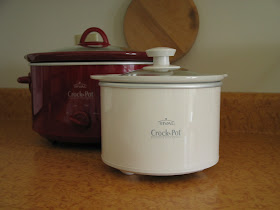
Big Red is a  3.5 quart capacity crock pot. That's kind of big for these amounts. I actually used my Dip Master (don't you love that name) which holds 1.5 quarts.


It just barely took all of the ingredients when I put them in cold but was a good size once everything melted. The Dip Master does not get as hot as quickly as a regular crock pot so I did have to nuke the ingredients to hurry things along. If you have a big honking crock pot you might want to look for a smaller one, a Dip Master, or even a fondue pot. I promise that this dip is worth it.


Once all the ingredients are all melty and bubbly, turn the crock pot to warm and serve with tortilla chips, crackers, veggies. It does need to stay in a warm crock pot or fondue pot as the dip will begin to firm up as it cools.


Next time I make this--- crabmeat.


Now let me warn you--- this is a very rich recipe. Even though it's not shown here (because I used what I had), I would strongly encourage low-fat ingredients. Yes, yes- some folks just don't care for the taste of low-fat ingredients. That's where the hot sauce comes in handy- gives it a bit of zing.

So get that crock pit warmed up and enjoy.

See ya next time.

Saturday, October 23, 2010

A New Project To Think About- Amen Sister!!

Our church has been in the midst of a remodeling project this summer. New platform, choir risers, walnut paneling, stonework, audio-visual.... the works. New carpet is the next big thing to happen, beginning this week. But in order to put in new carpet, you have to unbolt and remove all the pews. And if you're taking out the pews, may as well go with new seating too. That means ....


... a mini pew for Chrysalis to play with! Yippee!


Zippy couldn't wait to demonstrate. Since it was a front row pew, it has the hymnal rack in front under the seat ...


... and the hymnal rack/communion cup holder on the back. Cool.


So the question is, what to do with it. We know it will need to be reupholstered and there are some minor finish issues. We don't know what the wood under the upholstery might be or if it is best kept covered. No biggie -  it is thirty years old, though our 200 year old house makes it look like modern art. I would still love to score an old pew with the neat-o carving along the ends but this particular pew is kind of special as it's the one our pastor sat in all those years. So we'll make it work.


Our philosophy on this sort of thing is to live with it for awhile (and apparently crawl under it) and see how it goes. When we bought our house, we were so gung-ho to get the remodelling under way that we made some choices that don't necessarily fit with our house. So we've learned to slow down and just see how things develop, to let the ideas ripen. Maybe that's our code for "I'm so sick of working on this house I could scream" but whatever gets you through the day.

Plus my tastes are changing from sweet pink chabby chic cottage (note the hanging quilt behind the pew and the floral rug) to something, oh, less of that and more understated. In my mind I hope that it's sophisticated but then that would be presumptuous on my unsophisticated self's part.


So I looked around to see what folks are doing with church pews.


Scherer's Furniture
Um, no.


ShelterPop
Well, I can always get excited about more room for books but am not necessarily leaning towards a bed in the foyer.


House To Home
Cute, but no eating in the foyer.


Four Sisters In A Cottage
Really sweet and pink and floral and cottage-y: all the things I like but moving in a different direction. But it is sweet.


Apartment Therapy
Yes, this is very pretty and serene. Me likey.


Colorado Cowgirls
Cowhide. Hmmm. Again, not really the look I was hoping to achieve. But interesting.


So while our new-to-us mini pew stews in its juices in the front parlor, I would love to hear your ideas. Come on sisters, let's talk colors and fabric and paints and stains and pillows.


Can I get an Amen?


Wednesday, October 20, 2010

Halloween Candles, Take Two


Yesterday I shared a tutorial for this little Mod Podge Halloween votive. After trying it out, I decided that it would be just a bit too "fiddly" for the patients that I have right now so I started pondering how to get a similar look that was a bit more straight forward.

I started thinking about a post I had seen over the summer on Gingerbread Snowflakes about using Mod Podge and food coloring to make luminaries and glassware. So I went back to Pam's blog to take a look and they were just as fabulous as I remembered- hit the link here to go take a peek but don't forget to come back for my Halloween version (yes, Pam has alot of really great things on her blog and you'll be easily distracted).


Here is the "less fiddly" version that I came up with using colored Mod Podge.


You'll need:

A small candle votive
Mod Podge
Food coloring- red and yellow
Wax paper
Brush
Black scrapbook or construction paper
Small container


Clean your votive and turn it upside down on the wax paper.


Pour a very small amount - like 2 tablespoons- of Mod Podge into your little container. I used one of those Glad disposable containers that I never dispose of.


Just in case you're wondering, this project goes much more smoothly if you don't drop the cap to the food coloring into your Mod Podge. I'm just sayin' ...


I started out with one drop of red food coloring and two of yellow.


It was too light and knowing that this dries much lighter and translucent...


... I added two more red and one yellow.


And then I added some more. The total came to five red and five yellow drops of food coloring.


Start painting on the Mod Podge. Some of the folks who have done this discuss things like stippleing and other techniques to get rid of the brush marks. For this project though, I thought the brush markers could serve as the vertical ribbing on the pumpkin so I didn't worry about them and there's no need for you too either.


Once the votive was coated with a nice layer, I put the lid on the Glad container and saved it just in case.


Sure enough, it dried nice and translucent but I wanted it darker so the color would stay nice and pumpkin-y when the candle was lit. So I added a second coat.


This time I added the facial features  to the pumpkin that I cut with the CriCut. Remember, he's upside down. It's OK to coat over the facial features with the colored Mod Podge as it dries translucent.

It looks like one hot spooky mess right now, doesn't it?

Follow the same steps as before to trim the edge of the rim with an exacto knife and add glitter glue around the opening at the top.


And Wa-La!


Now he looks pretty spiffy! The color is a bit deeper with this guy than with the tissue paper votive. I suppose you could tint the Mod Podge for the tissue paper version if you wanted but that seems kind of redundant. Maybe it would give some vertical pumpkin ribbing. Oh man-- now I have to make another one to see .....


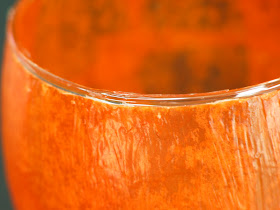
There is definitely a difference in texture between the two versions.

Now, because I just have to play with the possibilities, I made another version using plain old Elmer's Glue.


I didn't use as much food coloring (start with two red and four yellow) and the colors right away appeared to be brighter. I knew from a test patch that I did the other day that the white glue does not dry as translucent as the Mod Podge when tinted so I held off with the facial features and let the first coat dry completely.


The white glue tries translucent but without the brush marks.


So I added another coat plus the facial features.


And there is our third little pumpkin. Pardon the messy glitter glue on the rim but I was rushing things along with the hair dryer and, well... things happen.


As you can see, each of our triplets has its own personality. The tissue paper guy(bottom) born first, is a bit rustic. The second pumpkin born has an old world glass look to him while the last of our triplets is smooth and almost modern with his frosty opacity.


Even when lit they have subtle but distinct differences. I guess it all comes down to what you have available- just run with it.


The surprise of how it comes out is half the fun!

Thanks for working through this project with me and please stop back again.

Tuesday, October 19, 2010

Halloween Candles


I was messing around trying to get a craft together for work the other day so I went with a tried and true project-- Mod Podge Anything! I know, this has been done- but I hadn't done it yet so away I went..

You need:
Small roundish candle votive
Orange tissue paper
Mod Podge
Black scrapbook or construction paper
Glitter glue in a bottle with a tip
Scissors
Wax paper


This perfectly shaped candle votive is from Dollar Tree.
(I know, I need to get a light box rig fixed up but my little Mom Cave play space just doesn't have much, well... space.)


Cut tissue paper into about 1 inch squares. No need to be exact.


Turn your votive over on the wax paper. This prevents the tissue paper and Mod Podge from lapping over to the inside, where it could conceivably catch fire. Safety First.


You know the drill... brush on the Mod Podge in one small area at a time...


lay on the tissue paper ...


and cover with more Mod Podge. I used the Hard Coat flavor Mod Podge for this project since the coated bottom will be in contact with surfaces like window sills, tables, etc. The Hard Coat flavor doesn't stick like the regular does at times.


Work your way around the votive until it is completely covered, overlapping the tissue squares as you go. Go ahead and add some extra patches and layers so that the orange doesn't fade when the candle is lit. Make sure to get the Mod Podge and paper all the way to the edge.  It's OK if the tissue paper hangs over the rim onto the wax paper, just be sure to use your brush to get the paper up against the votive.


I used my CriCut to cut out little pumpkin faces but free hand is just as good. Glue the face onto the votive but remember that he is upside down. I realized afterwards that the face probably needs to be just a taddy bit higher. Lower? Closer to the rim of the candle votive. OK- now let him dry completely, upside down on the wax paper.


When your little pumpkin fella is dry he will peel right off the wax paper. But he will also have these raggedy edges. I used an exacto knife to go around the rim and trim all that off.


Neat and tidy!


Next I went around the edge with the glitter glue and gave him a nice sparkly trim. Let that dry completely.


And there he is!


Of course doing one design, one time, is never going to satisfy me so I conjured up a couple friends for him. The white ghost takes an extra good layer of white tissue so it stays white when lit instead of just looking frosty.


And a cat. Everyone needs a spooky little kitten at Halloween.

Once these were done I started thinking about the patients I currently have and this may be too fiddly, mainly because the tissue paper can be hard to see once you start coating it with the Mod Podge.

So, what to do ....

Check back tomorrow and I'll show you Take Two of the Halloween votives.